Activities - Quiz
The Moodle online quiz allows teachers to create electronic tests that students complete directly in the system. The quiz can contain various types of questions, such as multiple-choice, short-answer, matching, or open-ended questions. A major advantage is the automatic grading of most answer types, immediate feedback, and the ability to set a time limit, number of attempts, or a random order of questions and answers, which increases clarity, flexibility, and the efficiency of testing.
- Select the desired course.
- Click
Edit mode. - Choose the section where you want to add the quiz.
- Click
Activity or resource. - In the Activity section, find
Quiz. - The quiz settings page will appear.
- These settings, except for the Name field, can also be changed later. The Name field is required to create the quiz.
- After filling in the required fields, click
Save and display.

After creating the quiz, you can start editing it, change its settings, add questions to it, and after students submit it, the teacher can also view the results.
The Settings section in Moodle is used for detailed quiz configuration, including its name and description, time limit, grading method, question layout, question behavior, options for displaying results to students, quiz appearance, and other rules and access restrictions. Here, the teacher can also set security measures, conditions for attempts, overall feedback, and common module settings. It is therefore the main place where it is determined how the quiz will function and under what conditions students will complete it.
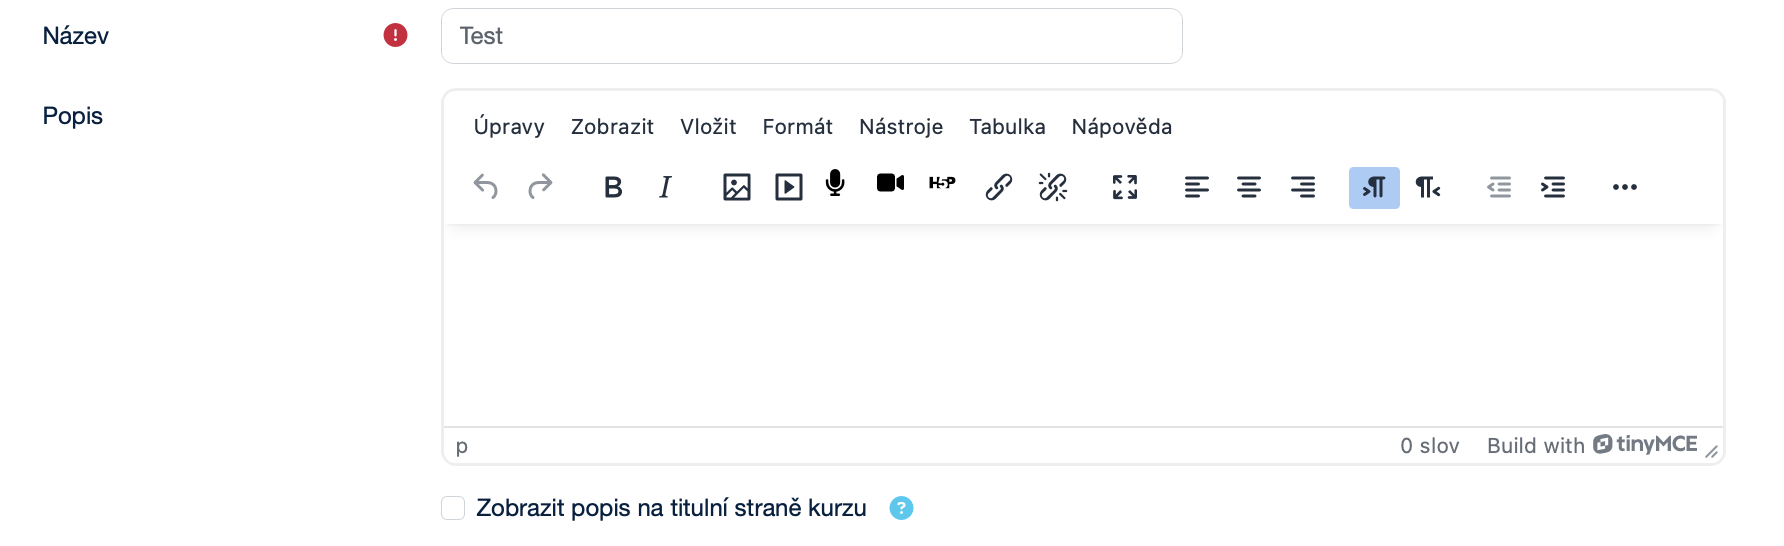
The General subsection contains the basic quiz parameters. It allows you to enter the name and description and, if needed, display this description on the course main page.
More about General
- Name: A text field for entering the course name. Next to it, there is a warning icon indicating that this field is required.
- Description: A text editor that allows text formatting and the addition of images, videos, links, and other content for the quiz description.
- Display description on the course page: A checkbox that determines whether the introductory description entered above will be displayed in the course outline below the name of the relevant activity or study material.
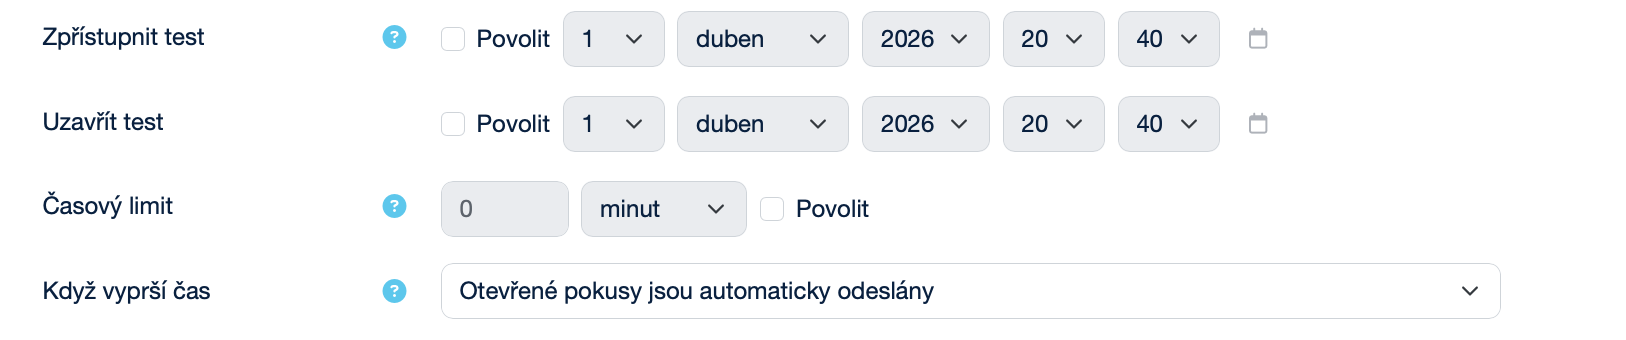
The Timing subsection is used to set the quiz availability, time limit, and the rules applied when the time expires. It allows you to determine when the quiz opens and closes, how much time students have to complete it, and how unsubmitted attempts will be handled.
More about Timing
- Open the quiz: Select the date and time when the quiz will become available to students (you must check Enable to activate it).
- Close the quiz: Select the date and time that will set the end of the quiz availability (you must check Enable to activate it).
- Time limit: Select the amount of time to determine how many minutes students have to complete the quiz (you must check Enable to activate it).
- When time expires: A drop-down menu that determines what happens after the time limit is reached. Options:
- Open attempts are submitted automatically – the system automatically submits whatever the student managed to complete.
- There is a grace period when open attempts can be submitted, but no more questions answered – the student can no longer change anything, but has a short time to submit the attempt.
- Attempts must be submitted before time expires, or they are not counted – after the limit, the attempt is invalid if it was not submitted in time.
The Grade subsection allows you to configure the quiz grading rules. You can choose the grade category, set the minimum grade required to pass, define the number of allowed attempts, and select the method used to calculate the final grade.

More about Grade
- Grade category: A drop-down menu that allows you to place the quiz into a specific category in the gradebook (for example, Quizzes or Assignments). The default option is Uncategorized.
- Grade to pass: A text field for entering the minimum grade required to pass the quiz (for example, 50.00).
- Attempts allowed: A drop-down menu for selecting the number of attempts available to the student, from 1 to 10 (the default is Unlimited).
- Grading method: A drop-down menu that determines how the final grade is calculated if multiple attempts are allowed. Options:
- Highest grade – the best result is used.
- Average grade – the average of all attempts is calculated.
- First attempt – only the first result is counted.
- Last attempt – only the last result is counted.
The Layout subsection determines how questions are distributed across pages and how students can navigate between them. You can set the number of questions per page, repaginate the quiz according to the new settings, and choose the navigation method. This makes it possible to adapt the quiz either for free navigation or for a strictly sequential progression.

More about Layout
- New page: A drop-down menu that determines how many questions will be displayed on one page. Options:
- Never, all questions on one page – all questions will be shown on a single page.
- Every question – each question has its own page.
- Every X questions – several questions are shown on one page (for example, every 3 questions).
- Repaginate now: A checkbox that reorganizes the pages according to the current settings.
- Show more … / Show less …: A button used to expand or hide additional settings.
- Navigation method: A drop-down menu that controls how students can move between pages. Options:
- Free – students can return to previous pages freely.
- Sequential – students can only move forward and cannot return to previous questions.
The Question behaviour subsection determines how individual questions in the quiz are displayed and evaluated. You can configure answer shuffling, the grading method (immediately, after submission, with penalties, or with certainty-based marking), and whether new attempts should build on previous ones.

More about Question behaviour
- Shuffle within questions: A drop-down menu (Yes/No).
- Yes – the order of answers (for example, A, B, C) will be shuffled.
- No – the order of answers remains fixed.
- How questions behave: A drop-down menu that determines how answers are graded. Options:
- Adaptive mode – allows multiple tries during the quiz with a penalty.
- Adaptive mode (no penalties) – allows multiple tries during the quiz without penalties.
- Deferred feedback – the student sees the result only after submitting the entire quiz.
- Deferred feedback with CBM – the student sees the result only after submitting the entire quiz; the certainty level affects the number of points gained or lost.
- Immediate feedback – the result for the question is shown immediately after answering.
- Immediate feedback with CBM – the student sees the result immediately after answering; the certainty level affects the number of points gained or lost.
- Interactive with multiple tries – the student can correct the answer (with a penalty).
- Show more … / Show less …: A button used to expand or hide additional settings.
- Each attempt builds on the last: A drop-down menu (Yes/No).
- Yes – the new attempt continues from the previous one and keeps the answers.
- No – each attempt starts completely from scratch.
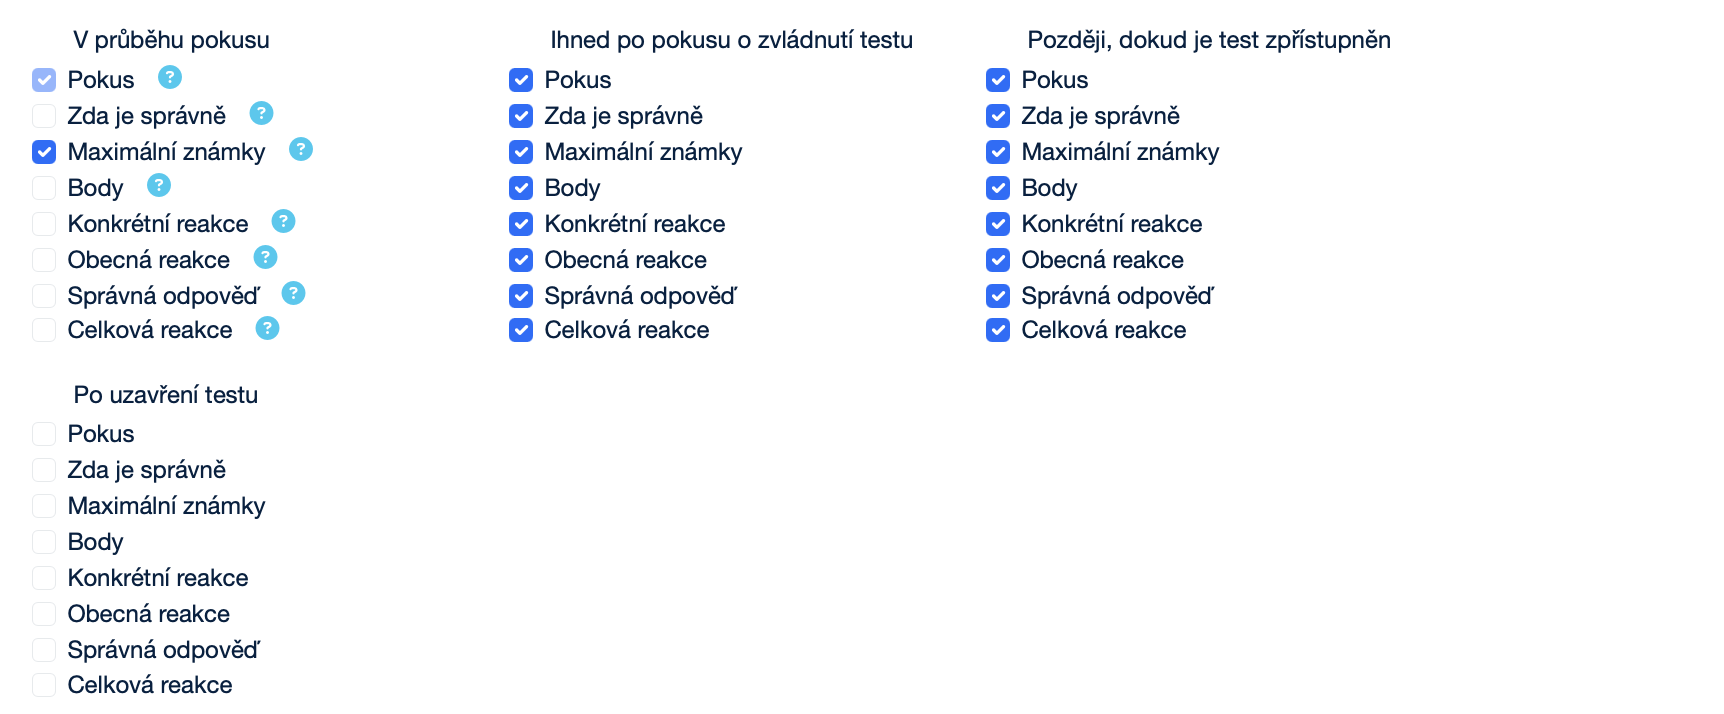
The Review options subsection determines what information and feedback students will see at different stages of the quiz — during the attempt, immediately after it, while the quiz is still open, or only after it has been closed. You can enable or disable the display of the attempt, points, maximum grades, answer correctness, and various types of feedback.
More about Review options
- Attempt: A checkbox that determines whether the student can review their attempt during the quiz.
- Whether correct: A checkbox that determines whether the student will see information about the correctness of the answer (Correct, Partially correct, Incorrect).
- Maximum marks: A checkbox that determines whether the student will see the maximum possible number of points for each question.
- Marks: A checkbox that determines whether the student will see the points awarded for each question and the total score for the attempt (available only when Maximum marks is enabled).
- Specific feedback: A checkbox that determines whether the student will see feedback depending on their answer.
- General feedback: A checkbox that determines whether the student will see general feedback after completing the question (for example, an explanation of the correct answer or a link to additional resources).
- Right answer: A checkbox that determines whether the student will automatically see a summary of the correct answer.
- Overall feedback: A checkbox that determines whether the student will see overall feedback at the end of the attempt based on their final grade.
- During the attempt – you can check the Attempt field (always checked by default) and Maximum marks.
- Immediately after the attempt – you can check the Attempt, Whether correct (always checked by default), Maximum marks, Marks (always checked by default), Specific feedback (always checked by default), General feedback (always checked by default), Right answer (always checked by default), and Overall feedback fields.
- Later, while the quiz is still open – you can check the Attempt, Whether correct (always checked by default), Maximum marks, Marks (always checked by default), Specific feedback (always checked by default), General feedback (always checked by default), Right answer (always checked by default), and Overall feedback fields.
- After the quiz is closed – you can check the Attempt, Whether correct, Maximum marks, Marks, Specific feedback, General feedback, Right answer, and Overall feedback fields.
The Appearance subsection allows you to configure which additional information will be displayed to the student during the quiz. You can determine whether the student’s name and profile picture are shown, set the number of decimal places in grades and in the marks for individual questions, and control the visibility of side blocks.

More about Appearance
- Show the user’s picture: A drop-down menu that determines whether the student’s name and profile picture will be displayed during the attempt. Options: No image, Small image, Large image.
- Decimal places in grades: A drop-down menu that determines how many decimal places will be displayed in students’ scores or grades (0–5). This setting affects only the display, not the actual calculation or rounding of grades.
- Show more … / Show less …: A button used to expand or hide additional settings.
- Decimal places in marks for questions: A drop-down menu that determines the number of digits displayed after the decimal point when grading individual questions. You can set a specific number (0–7) or use the same setting as for the overall grade.
- Show blocks during quiz attempts: A drop-down menu (Yes/No).
- Yes – students will see the side blocks added by the teacher (except for the Quiz navigation block).
- No – side blocks will not be displayed during the attempt.
The Safe Exam Browser subsection determines whether and how SEB (Safe Exam Browser) must be used to launch the quiz. The menu allows you to choose between optional use, manual configuration, uploading a custom configuration file, or launching the quiz with any SEB client configuration.

More about Safe Exam Browser
- Require the use of Safe Exam Browser: A drop-down menu (Yes/No).
- No – Safe Exam Browser is not required for taking the quiz.
- Yes – Configure manually – no template will be used; Safe Exam Browser can be configured manually.
- Yes – Upload my own config – you can upload your own SEB configuration file; manual settings and templates will be disabled.
- Yes – Use SEB client config – there is no SEB configuration on the Moodle side; the quiz can be launched with any Safe Exam Browser client configuration.
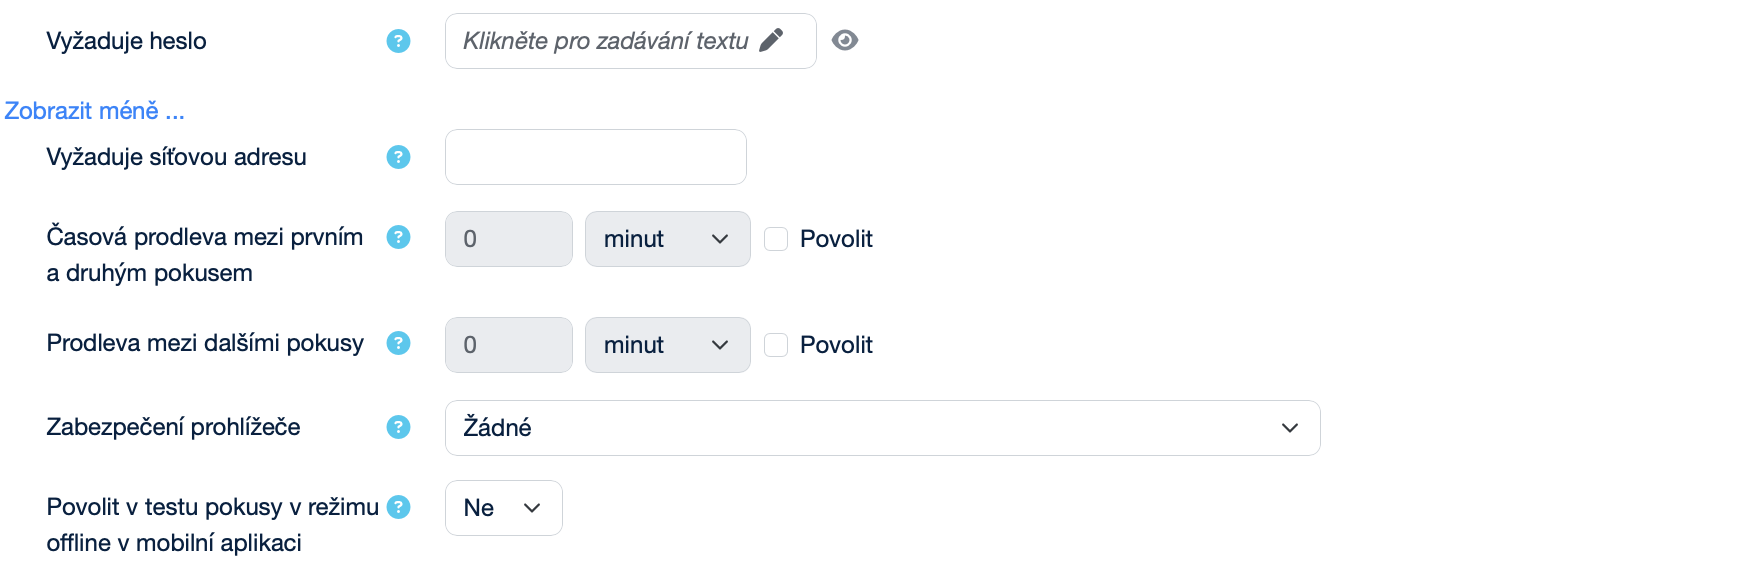
The Extra restrictions on attempts subsection allows you to configure detailed conditions for access to and repetition of the quiz. Here, you can set a password, allowed network addresses, time delays between attempts, the browser security level, and the option to allow the quiz to be taken offline in the mobile app. These settings are used to provide better quiz protection and to ensure fair conditions for all students.
More about Extra restrictions on attempts
- Require password: A text field for setting a password. If a password is set, students must enter it before each attempt at the quiz.
- 👁️ : Allows switching between showing and hiding the entered password.
- Show more … / Show less …: A button used to expand or hide additional settings.
- Require network address: A text field for entering full or partial IP addresses or CIDR ranges. It allows access to the quiz to be restricted only to selected subnets or devices.
- Enforced delay between 1st and 2nd attempts: A date/time selector that determines how long a student must wait before making the second quiz attempt (you must check Enable to activate it).
- Enforced delay between later attempts: A date/time selector that determines how long a student must wait before making the third and each subsequent quiz attempt (you must check Enable to activate it).
- Browser security: A drop-down menu for selecting the quiz security level. Options:
- None – no restrictions; the quiz opens normally in the browser.
- Full screen pop-up with some JavaScript security – the quiz is displayed in a full-screen window without navigation elements, requires JavaScript to be enabled, and restricts functions such as copying and pasting.
- Allow quiz attempts offline in the mobile app: A drop-down menu (Yes/No).
- No – the user cannot start the quiz offline.
- Yes – the user can download the quiz into the mobile app and start an attempt offline (with limitations: it cannot be used with a time limit, required network address, question behaviors other than deferred feedback, or sequential navigation).
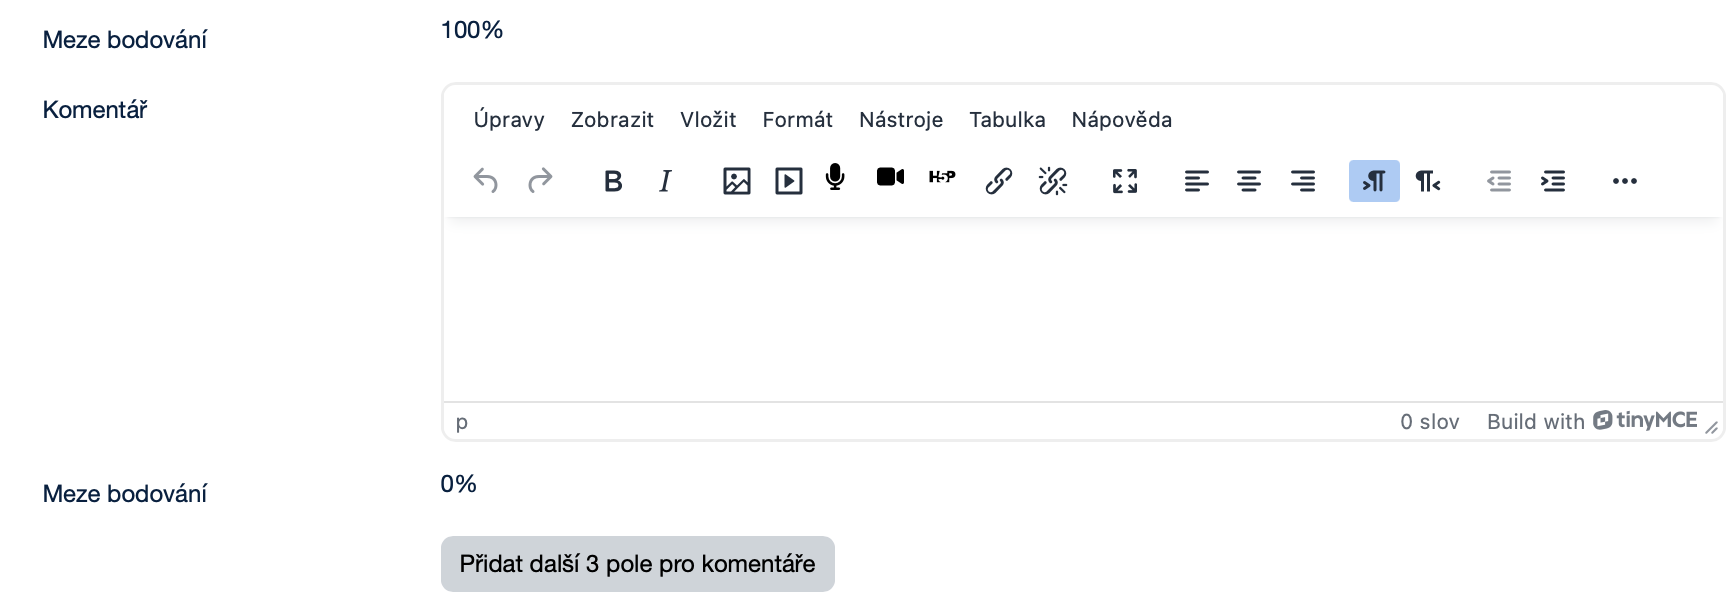
The Overall feedback subsection is used to set feedback for students after they complete the quiz. It allows you to define grade boundaries and add comments, including formatted text, images, or links. If needed, you can use the button to add additional feedback fields.
More about Overall feedback
- Grade boundary: A text field for setting the minimum and maximum number of points that a student can achieve in the quiz.
- Feedback: A text editor that allows text formatting and the addition of images, videos, links, and other content for the feedback.
- Add 3 more feedback fields: A button for adding three new empty fields for entering additional possible feedback comments.
The Common module settings subsection allows you to configure the basic properties of the module — for example, its visibility to students, the ID number for grading, the display language, the group mode, and, if needed, assignment to a selected grouping.

More about Common module settings
- Availability: A drop-down menu that determines whether the activity (for example, a quiz) will be visible to students on the course page. Options:
- Show on course page – the activity is available to students (depending on any access restrictions).
- Hide on course page – the activity is not visible to students.
- ID number: A text field used to uniquely identify the activity or resource — for example, for grade calculations or custom reports. For normal use, this field can be left blank.
- Force language: A drop-down menu that allows you to force the display language of the activity or the student’s environment regardless of the course language. Options:
- Do not force – the system default setting or the course language will be used.
- Czech (cs) – the activity will be displayed in Czech.
- English (en) – the activity will be displayed in English.
- Group mode: A drop-down menu that allows you to determine how students will be divided into groups within the activity:
- No groups – all students work together without being divided into groups.
- Separate groups – students can see and work only within their own group.
- Visible groups – students work in their own group, but they can also see the work of other groups.
- Grouping: A drop-down menu for selecting a specific set of groups within the course. If a grouping is assigned to the activity, the activity is intended only for members of the groups included in that grouping (Group mode must be set to Separate groups or Visible groups).
- Add groups / grouping to access restrictions: A button used to add groups or groupings of users for whom access to a certain part of the system will be restricted or allowed.
The Restrict access subsection allows you to set conditions for access to the activity — for example, based on date, achieved grade, interface language, student profile data, or a combination of multiple restrictions.

More about Restrict access
- Add restriction: A button that opens a pop-up window with a selection of options (for example, Date, Grade, Language, User profile) that can be used to set access conditions. In the list of restrictions, you can specify whether the student must meet all restrictions or only some of them.
- Date: A button that allows you to prevent access until or from a specified date and time.
- Grade: A button that allows you to require students to achieve a specified grade. It is used to select a specific activity in which a certain percentage grade is required. Two conditions can be set:
- must be ≥ – the student must achieve at least the specified percentage,
- must be < – the student must not exceed the specified percentage.
- Language: A button that allows you to require students to use a specific language.
- Czech (cs) – they must use Czech.
- English (en) – they must use English.
- User profile: A button that allows you to control access based on fields in the student’s profile.
- Field options: Address, Email address, ID number, Institution, First name, City/town, Mobile phone, Department, Surname, Phone, Country, ICQ, Skype ID, Web page.
- Condition options: is equal to – exact match with the entered text, contains – contains the entered text, does not contain – does not contain the entered text, starts with – starts with the entered text, ends with – ends with the entered text, is empty – the field is not filled in, is not empty – the field is filled in, + Text field for comparison with the entered text
- Restriction set: A button for applying more complex logic by adding a set of nested restrictions. It works in the same way as Add restriction.
- Cancel: A button used to return back without saving changes.
The Tags subsection allows you to assign the activity to one or more tags. This helps with content organization and filtering.

More about Tags
- Manage standard tags: A button that opens the Default collection page, where the available tags can be edited.
- Enter tags…: A text field that allows you to assign specific tags to the activity.
The Saving the settings changes subsection describes the options for saving the changes made in the settings. The user can choose whether to save and display the changes, return to the course, send notifications to participants, or cancel them.

More about Saving the settings changesí
- Send content change notification: A checkbox that notifies course participants about a new or updated activity or resource. Only those who have access to it will receive the notification.
- Save and return to course: A button that saves the changes and returns you to the course.
- Save and display: A button that saves the changes and displays the updated activity.
- Cancel: A button that cancels the changes made.
The Questions section in a Moodle quiz is used to manage the quiz content. In the Questions subsection, the teacher can add new questions, change their order, adjust point values, configure pagination, and set the maximum overall grade for the quiz. In the Grade items setup subsection, it is possible to create grading items and assign them to specific questions or sections. This makes it possible to organize quiz results clearly into different grading areas.
To manage the content, you first need to add it to the quiz. In the Questions subsection, there are several ways to add questions: creating a new question, adding a question from the question bank, and adding a randomly selected question from the question bank.
Creating a new question:
- Click
Add. - Select the
+ a new questionoption. - Choose the question type (more detailed information about question types can be found in the Question bank – Question types section).
- Click
Addand configure the question. - Save the question.
Creating from question bank:
- Click
Add. - Select the
+ from question bankoption. - Choose the required question bank.
- Select the required category from the question bank.
- Click
Apply filters. - Select the required question or questions.
- Click
Add selected questions to the quiz.

Creating a random question:
- Click
Add. - Select the
+ a random questionoption. - Choose the required category from the question bank.
- Click
Apply filters. - Select the number of random questions.
- Click
Add random question.

Managing questions: After adding questions, you can remove them, change their placement on pages, and add sections.
Pozor!Questions cannot be added or removed once at least one student has started a quiz attempt.
More about Managing question
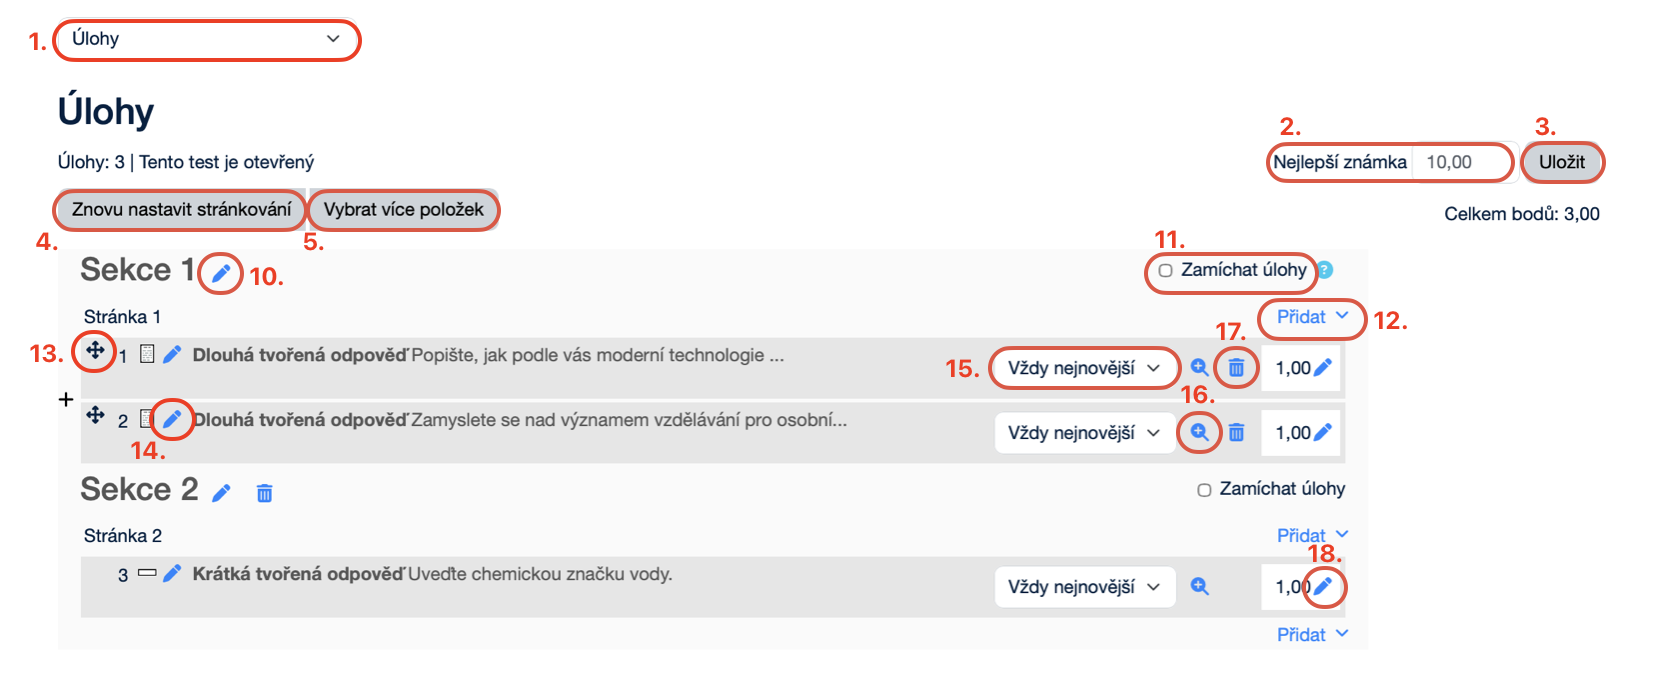
- Questions: A drop-down menu for displaying either the Questions or the Grade items setup associated with them.
- Maximum grade: A text field that allows you to enter the maximum number of points (for example, 100.00).
- Save: A button for confirming and saving the entered value.
- Repaginate: A button that restores the pagination settings to their default values.
- Select multiple items: A button that allows you to work with multiple items at once.
- Delete selected: A button for deleting the selected question.
- Cancel: A button that cancels working with multiple items at once.
- Select all: A button that selects all items in the current list or view.
- Deselect all: A button that clears the selection of all currently selected items.
- 🖊️: A button for adding a section title. A section can only be added if the quiz contains more than one page. After that, the option to add a section will appear between pages in the + Add menu.
- Shuffle: A checkbox that allows the order of questions in this section to be shuffled randomly each time a student attempts the quiz.
- Add: A drop-down menu that allows you to insert new questions into the quiz. Options:
- a new question – create a completely new question manually,
- from question bank – select a question from the existing question bank,
- a random question – the system randomly selects a question from the chosen category.
- ➕: A button for moving questions.
- 🖊️: A button for editing the question.
- Always latest: A drop-down menu for selecting the question version.
- 🔍: A button for previewing the question.
- 🗑️: A button for deleting the question.
- 🖊️: A button for editing the question points.
The Grade items setup subsection in a Moodle quiz is primarily used to divide the quiz into several parts for informational purposes, for example into a theoretical and a practical part. This setting is optional and does not need to be used unless it is necessary to track results for individual parts of the quiz. With this setting, both the teacher and the student can see how many points were earned in each part of the quiz. After the quiz is graded, Moodle automatically displays the number of points for each scoring item. Scoring items can be generated automatically based on quiz sections or created manually. However, it is not possible here to set a condition requiring the student to achieve a minimum number of points in a specific part, for example in the practical part.
The Results section in a Moodle quiz is used to monitor, review, and evaluate students’ attempts. It allows you to display an overview of results, review answers, analyze quiz data, and, if necessary, manually grade selected responses.
The Grades subsection provides an overview of students’ individual attempts and their evaluation. Here, the teacher can monitor points, final grades, attempt status, start and finish time, and the duration of each attempt. This section also includes filters and display options that make it possible to determine which attempts should be included in the report and how they will be displayed.
More about Grades
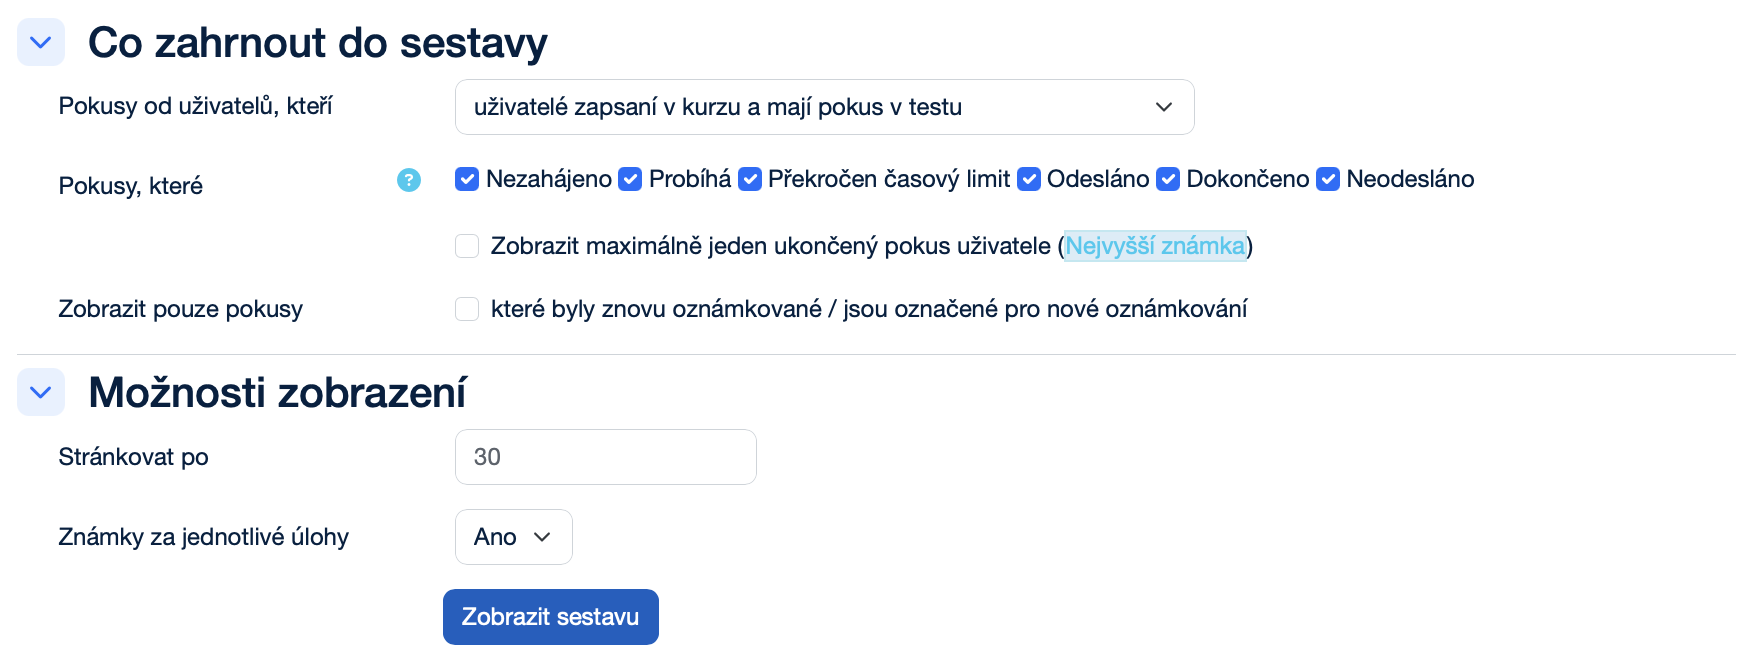
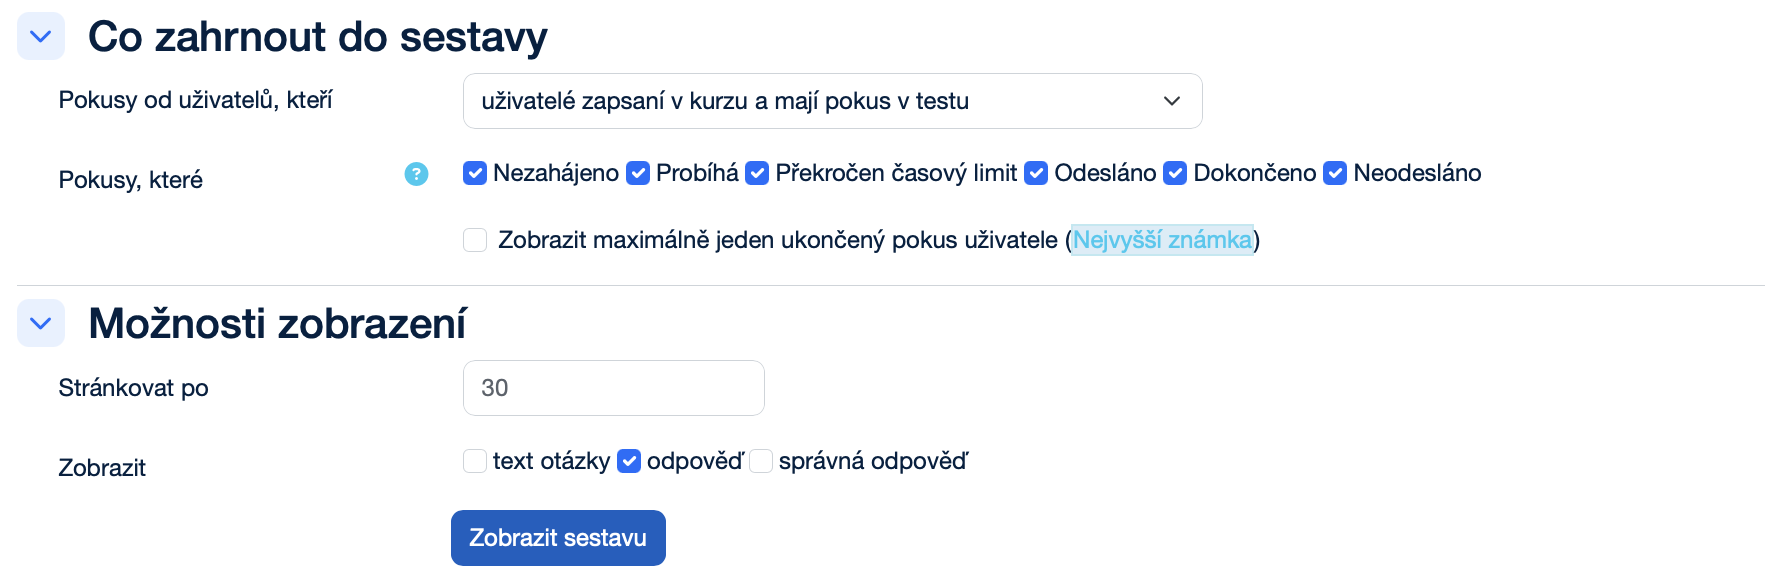
What to include in the report
- Attempts from users who are: A drop-down menu that determines which users will be shown in the report. Options:
- enrolled users who have a quiz attempt – shows only students who have actually attempted the quiz.
- enrolled users who do not have a quiz attempt – shows students who are enrolled in the course but have not yet attempted the quiz.
- enrolled users who have, or do not have, a quiz attempt – shows all students enrolled in the course, regardless of whether they have attempted the quiz.
- all users who have a quiz attempt – shows all users with a quiz attempt, even if they are not enrolled in the course.
Attempts that are: lets you filter the report by attempt status. The individual options are set using checkboxes:
- Not started: A checkbox that determines whether attempts that have not been started will be shown in the report.
- In progress: A checkbox that determines whether attempts that are currently open and unfinished will be shown in the report.
- Overdue: A checkbox that determines whether attempts for which the time limit has expired will be shown in the report.
- Submitted: A checkbox that determines whether attempts that have been submitted by the student will be shown in the report.
- Finished: A checkbox that determines whether attempts that have been closed and graded will be shown in the report.
- Never submitted: A checkbox that determines whether attempts that were ended without being submitted will be shown in the report.
- Show at most one finished attempt per user (Highest grade / Average grade / First attempt / Last attempt): A checkbox that determines whether only one attempt per student will be shown in the report.
- Show only attempts: A checkbox that determines whether only attempts that have been regraded or are marked as needing regrading will be shown in the report.
Display options
- Page size: A text field for entering the number of records displayed on one page.
- Question marks: A drop-down menu (Yes/No) that determines whether marks for each individual quiz question will also be shown in the report.
- Yes – the report will include marks for each question separately.
- No – only the overall grade will be displayed without a detailed breakdown.
- Show report: A button that applies the selected settings and generates the resulting report.
Attempts are displayed in a table, where each row represents one attempt by a specific user.
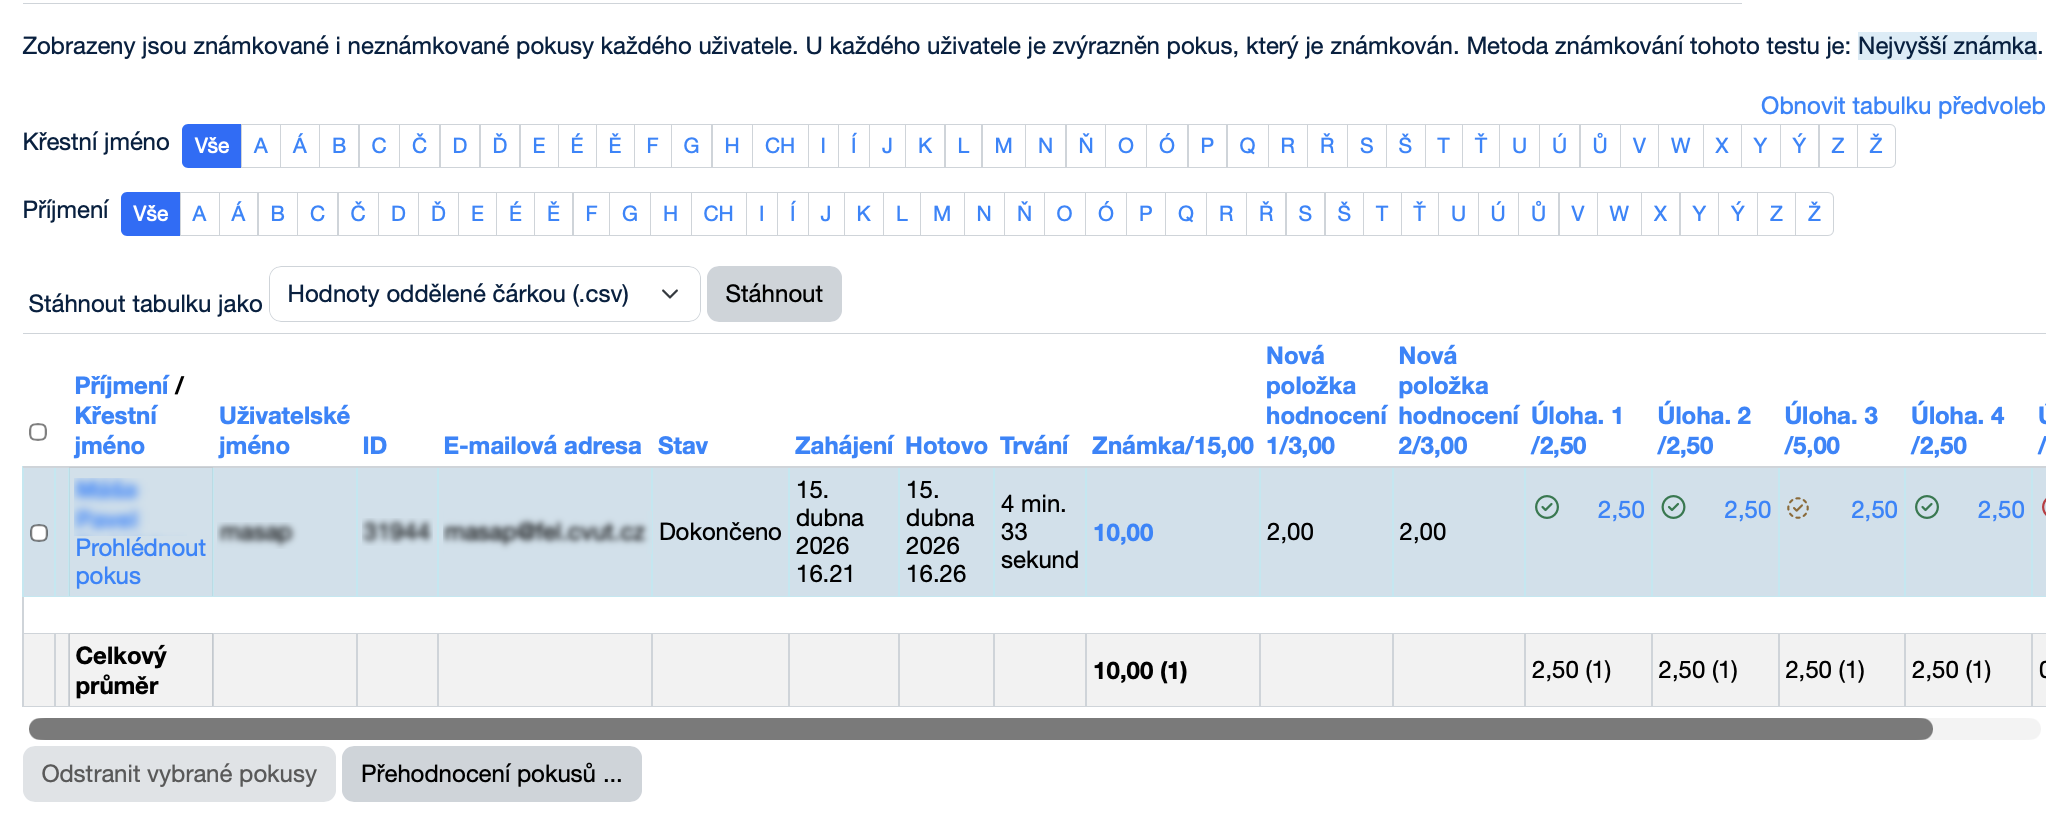
More about the Attempts table
- Reset table preferences: A button for resetting all modified table settings to their default values.
- First name: An alphabetical filter that allows you to display only users whose first name begins with the selected letter. The All button displays all users without restriction.
- Last name: An alphabetical filter that allows you to display only users whose last name begins with the selected letter. The All button displays all users without restriction.
- Download table data as: A drop-down menu that determines the file format in which the resulting table will be downloaded. Options:
- Comma separated values (.csv) – a universal text format suitable for import into various applications.
- Microsoft Excel (.xlsx) – a spreadsheet format for Microsoft Excel.
- HTML table – the results are saved as a web page in HTML format.
- JavaScript Object Notation (.json) – a structured format suitable for working with data in applications.
- OpenDocument (.ods) – a spreadsheet format compatible with LibreOffice and OpenOffice.
- Portable Document Format (.pdf) – a file format intended for printing or sharing in a fixed layout.
- Download: A button for starting the download of the file in the selected format.
- Last name / First name, Username, ID number, Email address, Status, Started, Completed, Duration, Grade, New grade item, Q. no.: Clicking the column header changes the sorting to ascending or descending according to that category.
- Student: A button that opens information about the student.
- Delete selected attempts: A button that allows you to delete the attempts selected in the list.
- Regrade attempts…: A button used to regrade selected attempts, for example after changing the correct answers or adjusting the scoring.
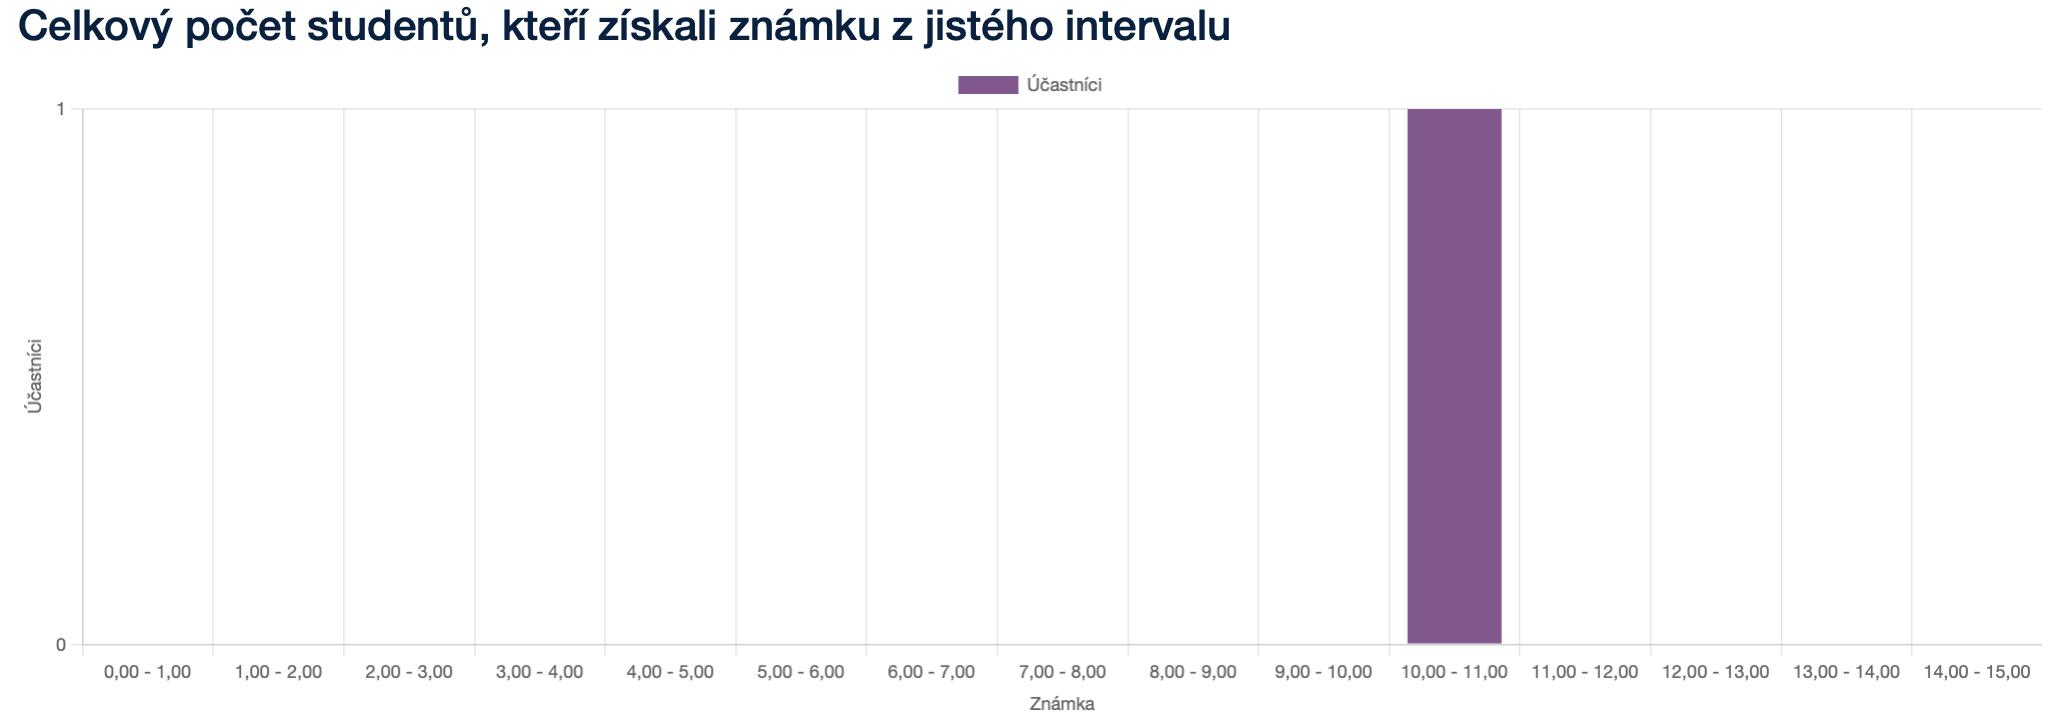
The Grades subsection also displays a graph showing the total number of students according to the score range they achieved. The horizontal axis shows the grade intervals, the vertical axis shows the number of participants, and the individual bars clearly indicate how many students achieved a result within each range.
The Responses subsection is used to display students answers to individual quiz questions in detail. It allows you to review how students answered, compare individual attempts, and verify the correctness or method of completing the answers.
More about Responses
What to include in the report
- Attempts from users who are: A drop-down menu that determines which users will be shown in the report. Options:
- enrolled users who have a quiz attempt – shows only students who have actually attempted the quiz.
- enrolled users who do not have a quiz attempt – shows students who are enrolled in the course but have not yet attempted the quiz.
- enrolled users who have, or do not have, a quiz attempt – shows all students enrolled in the course, regardless of whether they have attempted the quiz.
- all users who have a quiz attempt – shows all users with a quiz attempt, even if they are not enrolled in the course.
Attempts that are: lets you filter the report by attempt status. The individual options are set using checkboxes:
- Not started: A checkbox that determines whether attempts that have not been started will be shown in the report.
- In progress: A checkbox that determines whether attempts that are currently open and unfinished will be shown in the report.
- Overdue: A checkbox that determines whether attempts for which the time limit has expired will be shown in the report.
- Submitted: A checkbox that determines whether attempts that have been submitted by the student will be shown in the report.
- Finished: A checkbox that determines whether attempts that have been closed and graded will be shown in the report.
- Never submitted: A checkbox that determines whether attempts that were ended without being submitted will be shown in the report.
- Show at most one finished attempt per user (Highest grade / Average grade / First attempt / Last attempt): A checkbox that determines whether only one attempt per student will be shown in the report.
Display options
- Page size: A text field for entering the number of records displayed on one page.
- Show the: lets you choose which information will be displayed in the responses overview. The individual options are set using checkboxes:
- question text: A checkbox that determines whether the text of individual questions will be shown in the overview.
- response: A checkbox that determines whether students’ responses will be shown in the overview.
- right answer: A checkbox that determines whether the correct answers to individual questions will be shown in the overview.
- Show report: A button that applies the selected settings and generates the resulting report.
Responses are displayed in a clear table that allows you to review information about individual attempts as well as students answers to specific questions.
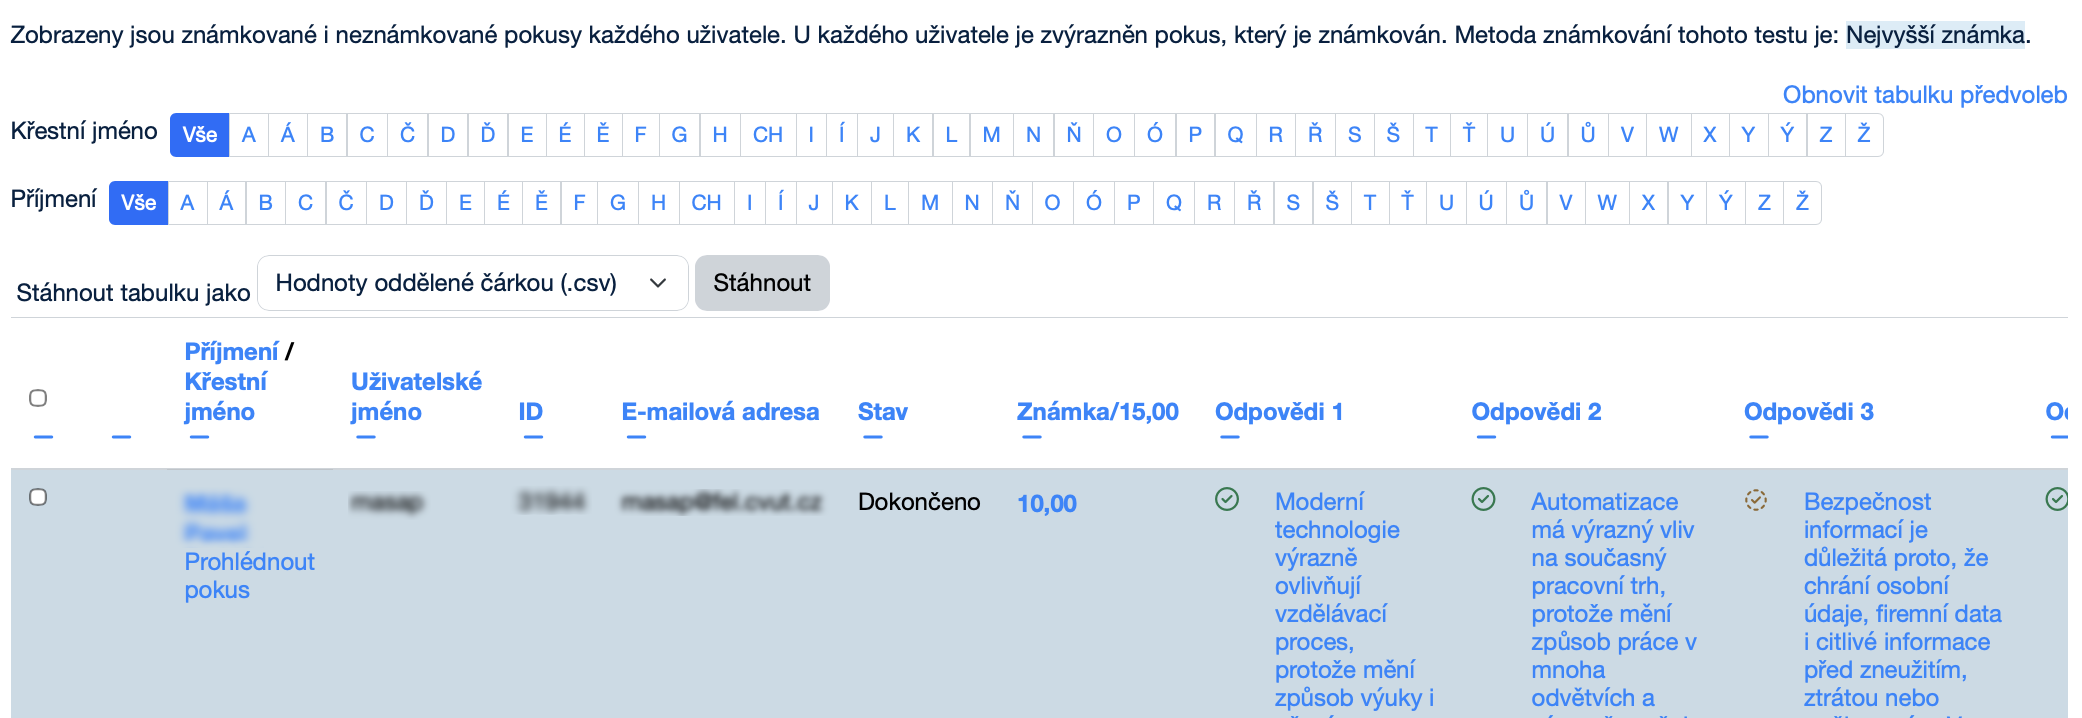
More about the Responses table
- Reset table preferences: A button for resetting all modified table settings to their default values.
- First name: An alphabetical filter that allows you to display only users whose first name begins with the selected letter. The All button displays all users without restriction.
- Last name: An alphabetical filter that allows you to display only users whose last name begins with the selected letter. The All button displays all users without restriction.
- Download table data as: A drop-down menu that determines the file format in which the resulting table will be downloaded. Options:
- Comma separated values (.csv) – a universal text format suitable for import into various applications.
- Microsoft Excel (.xlsx) – a spreadsheet format for Microsoft Excel.
- HTML table – the results are saved as a web page in HTML format.
- JavaScript Object Notation (.json) – a structured format suitable for working with data in applications.
- OpenDocument (.ods) – a spreadsheet format compatible with LibreOffice and OpenOffice.
- Portable Document Format (.pdf) – a file intended for printing or sharing in a fixed layout.
- Download: A button for starting the download of the file in the selected format.
- Last name / First name, Username, ID number, Email address, Status, Grade, Response no.: Clicking the column header changes the sorting to ascending or descending by that category.
- Student: A button that opens information about the student.
- Delete selected attempts: A button that allows you to delete the attempts selected in the list.
The Statistics subsection in a Moodle quiz is used for the analytical evaluation of quiz results and its individual questions.

More about Statistics calculation settings
- Calculate statistics from: A drop-down menu that determines which attempts will be used to calculate the quiz statistics. Options:
- highest graded attempt – the statistics are calculated from the attempt in which the student achieved the best result.
- all attempts – the statistics are calculated from all submitted attempts.
- first attempts – the statistics are calculated only from each student’s first attempt.
- last attempt – the statistics are calculated only from each student’s last attempt.
- Show report: A button that applies the selected settings and generates the resulting report.
In the Quiz information section, the basic summary data about the quiz and the evaluated attempts are displayed. This section includes, for example, the quiz and course name, the number of graded attempts, and selected statistical indicators such as the average grade or the median.
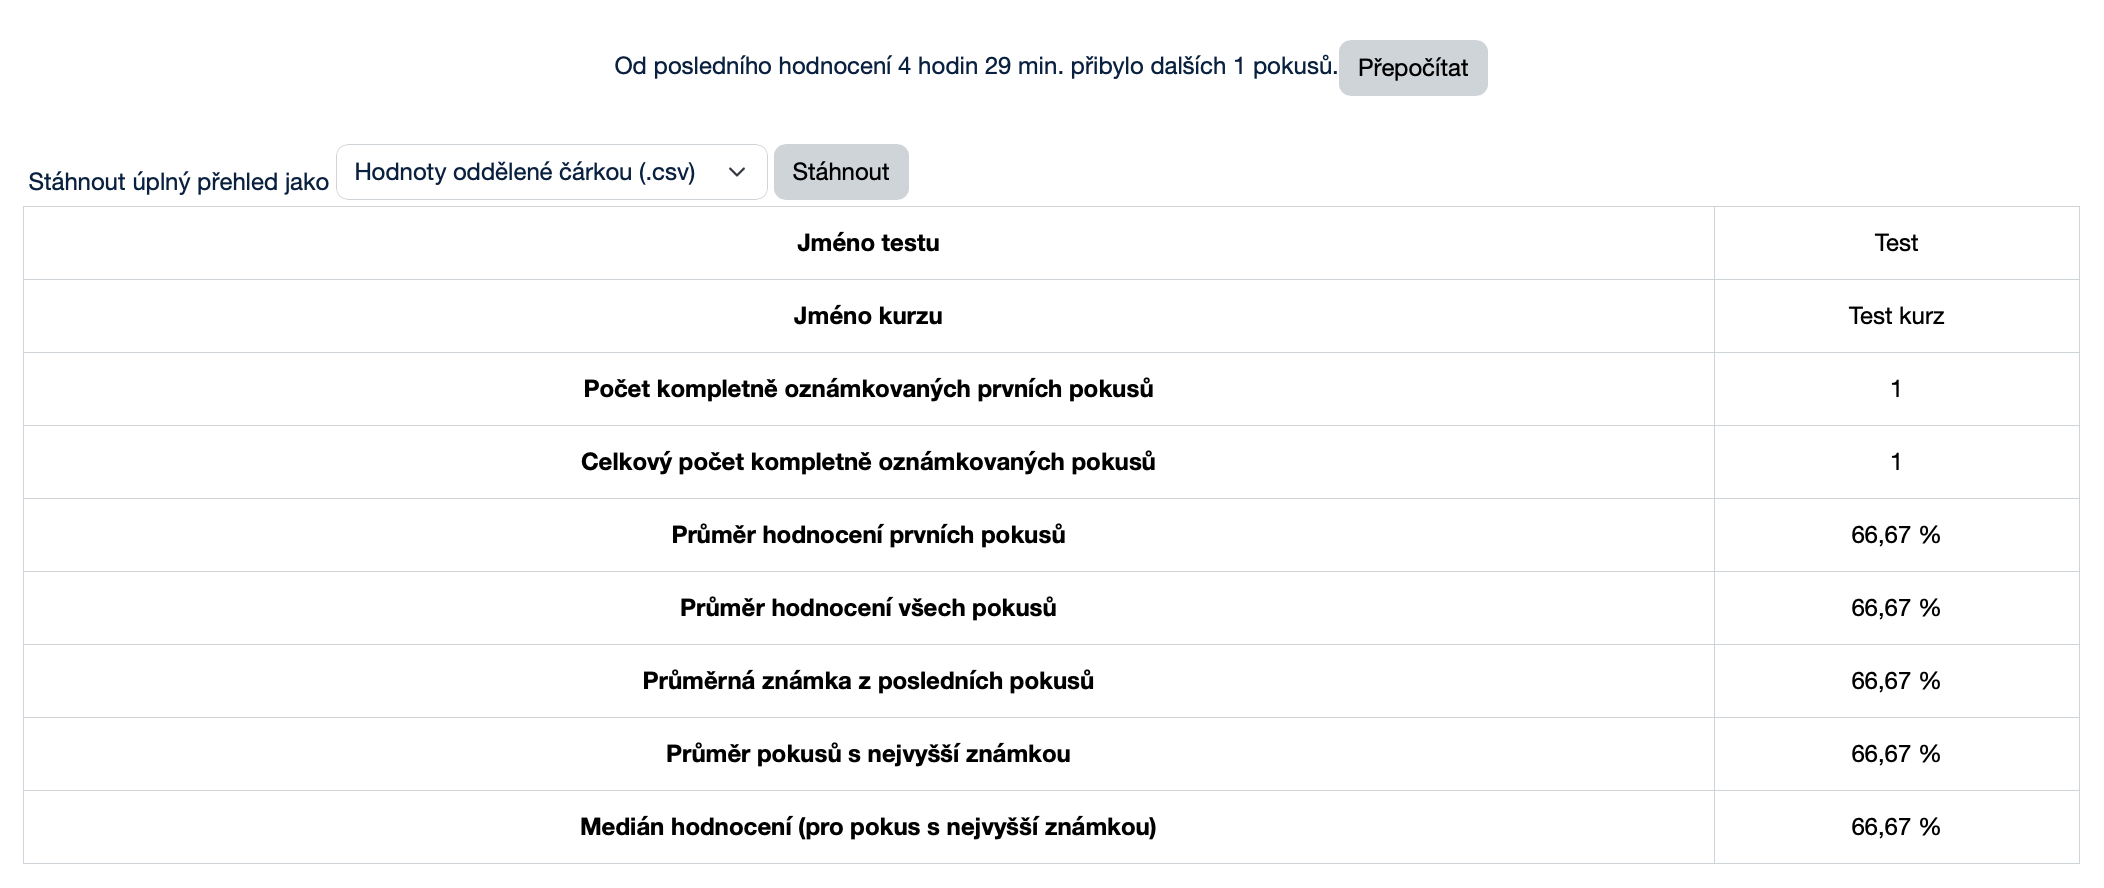
More about Quiz information
- Recalculate now: A button used to recalculate the quiz statistical data. It is used when new attempts have been added since the last calculation or when changes have been made to the results.
- Download table data as: A drop-down menu that determines the file format in which the resulting table will be downloaded. Options:
- Comma separated values (.csv) – a universal text format suitable for import into various applications.
- Microsoft Excel (.xlsx) – a spreadsheet format for Microsoft Excel.
- HTML table – the results are saved as a web page in HTML format.
- JavaScript Object Notation (.json) – a structured format suitable for working with data in applications.
- OpenDocument (.ods) – a spreadsheet format compatible with LibreOffice and OpenOffice.
- Portable Document Format (.pdf) – a file intended for printing or sharing in a fixed layout.
- Download: A button for starting the download of the file in the selected format.
In the Quiz structure analysis section, the table displays statistical data for individual quiz questions. For each question, you can track values such as the number of attempts, the facility index, the intended and effective weight, the discrimination index, and the discrimination efficiency, which helps assess the quality and difficulty of individual questions.
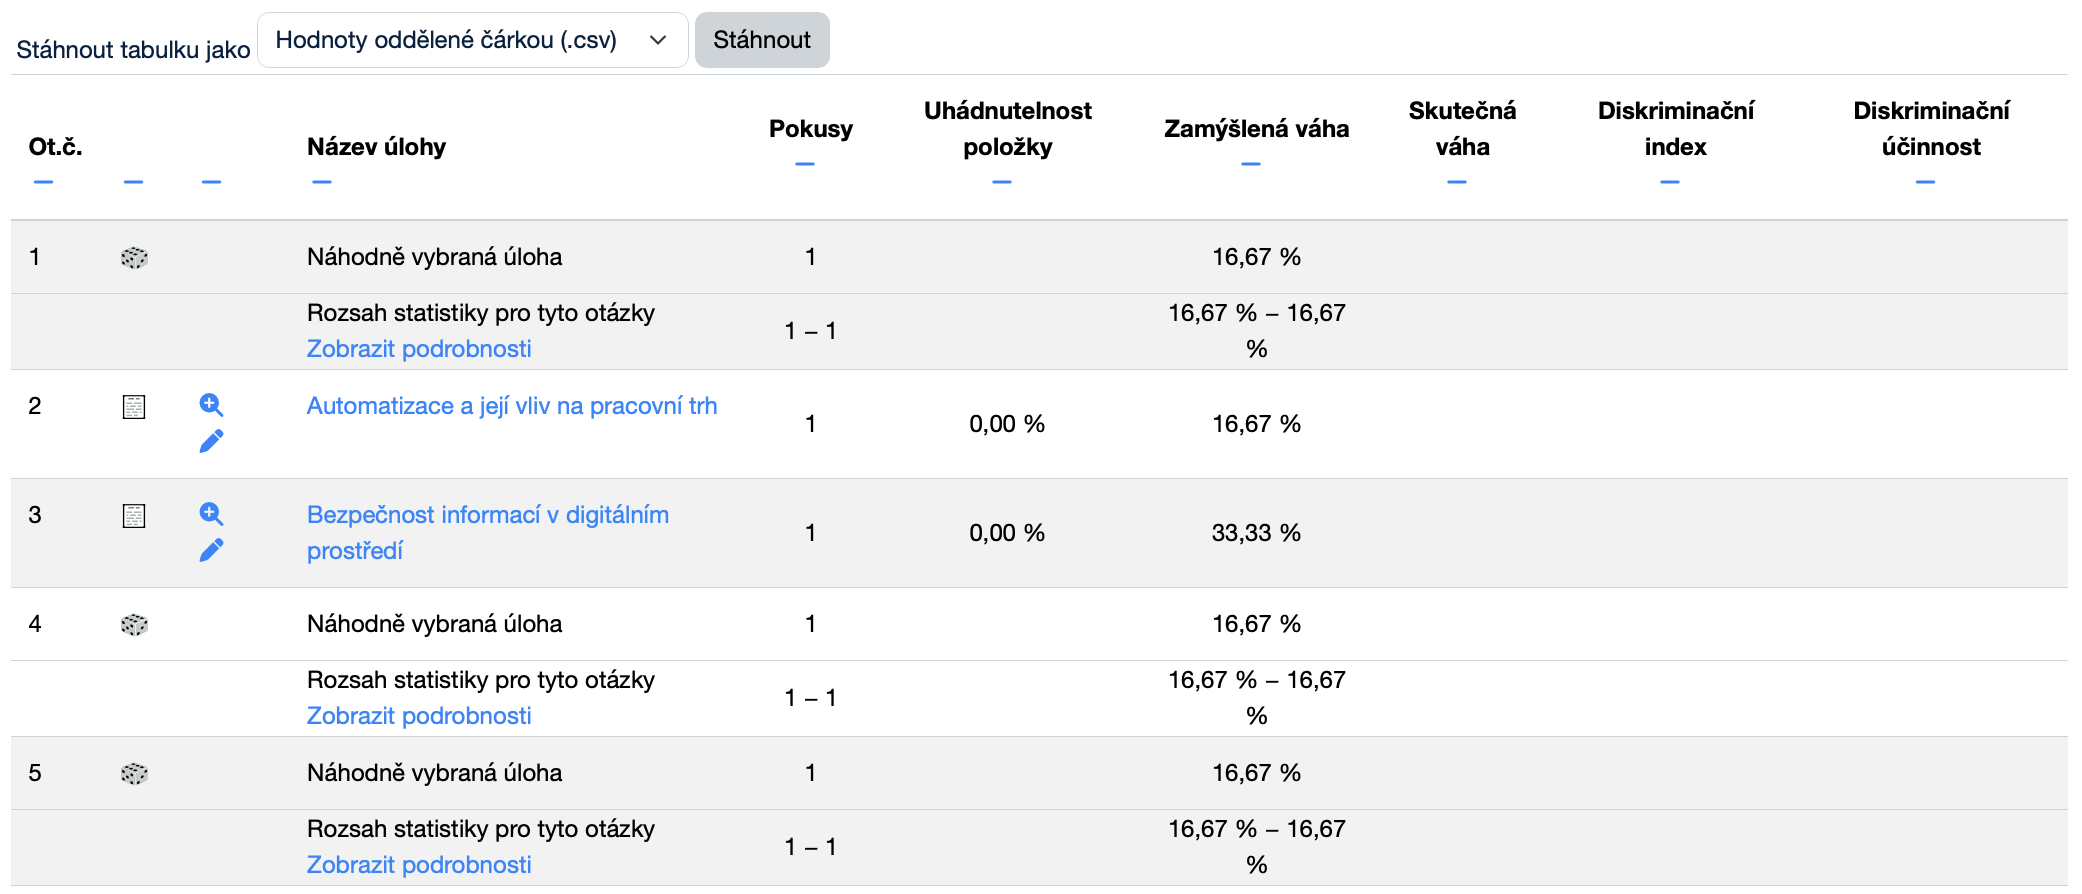
More about Quiz structure analysis
- Download table data as: A drop-down menu that determines the file format in which the resulting table will be downloaded. Options:
- Comma separated values (.csv) – a universal text format suitable for import into various applications.
- Microsoft Excel (.xlsx) – a spreadsheet format for Microsoft Excel.
- HTML table – the results are saved as a web page in HTML format.
- JavaScript Object Notation (.json) – a structured format suitable for working with data in applications.
- OpenDocument (.ods) – a spreadsheet format compatible with LibreOffice and OpenOffice.
- Portable Document Format (.pdf) – a file intended for printing or sharing in a fixed layout.
- Download: A button for starting the download of the file in the selected format.
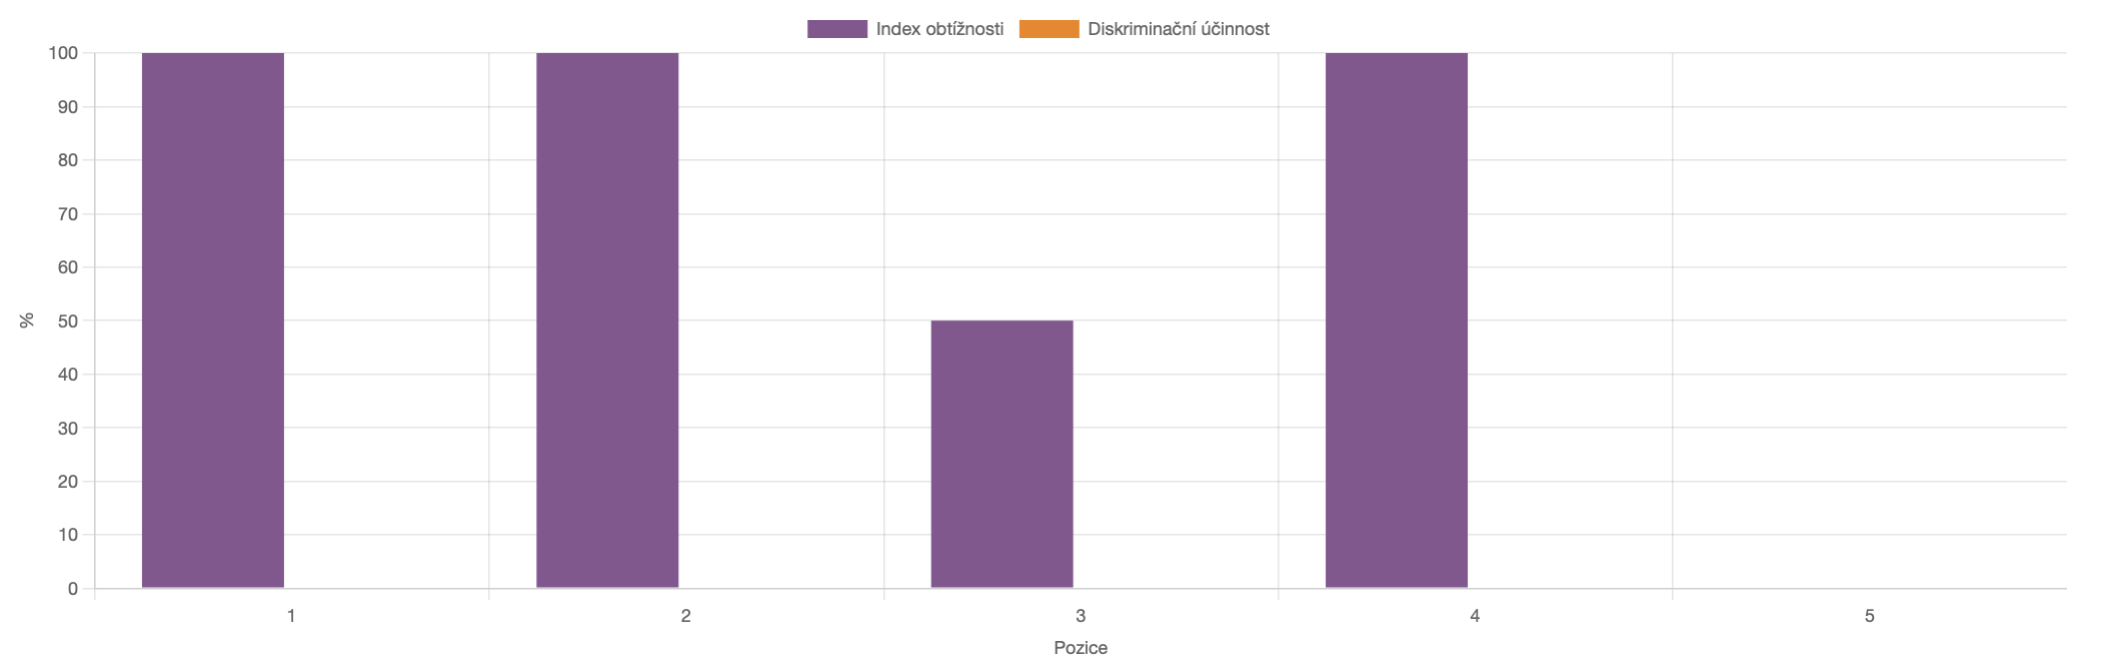
In the Statistics for question positions section, a graphical comparison of selected statistical indicators for individual questions in the quiz is displayed. This section makes it possible to track in particular the facility index and discrimination efficiency for each question position, helping you quickly assess which questions were easier or more difficult for students.
The Manual grading subsection is intended for evaluating responses that cannot be graded automatically. It is used especially for open-ended questions, essays, or other types of questions that require individual assessment by the teacher.
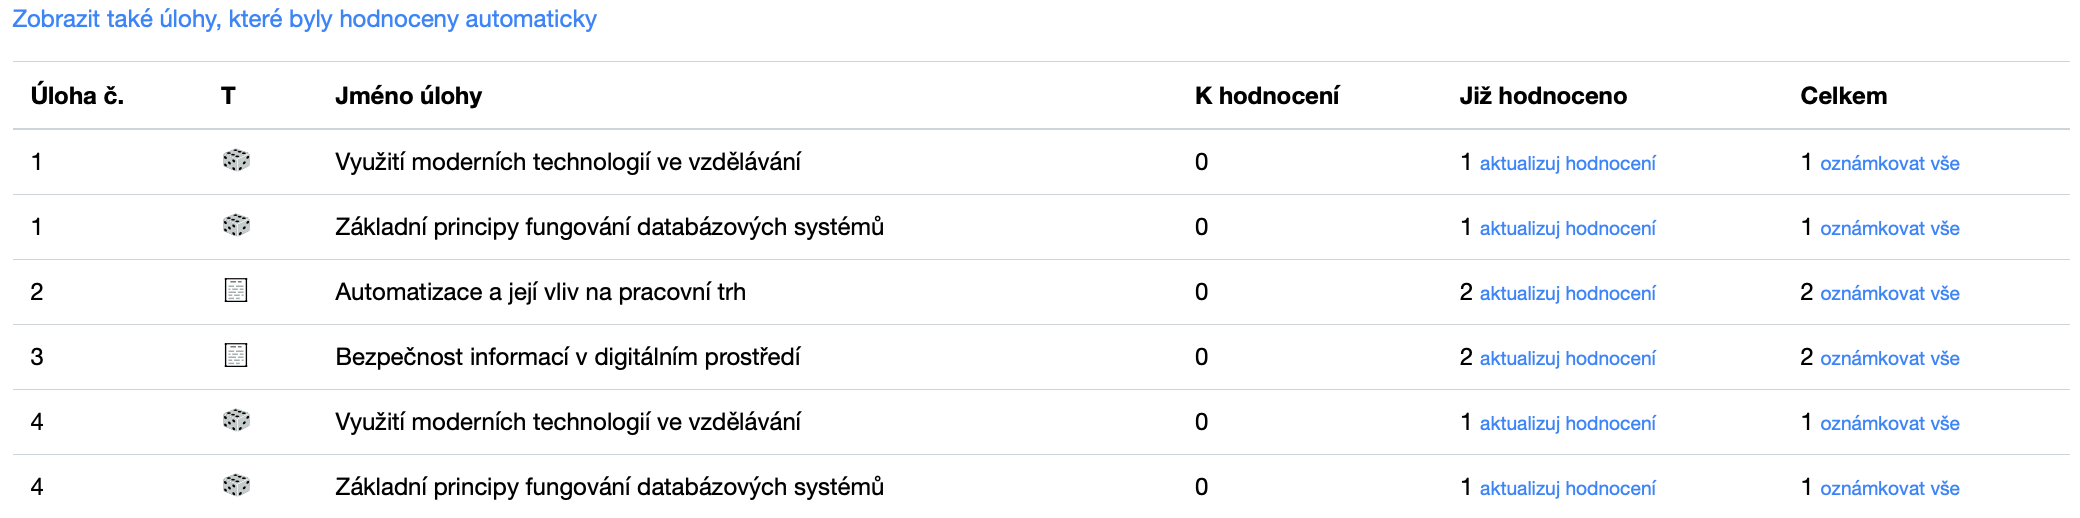
More about Questions that need grading
- Also show questions that have been graded automatically: A button that allows you to expand the overview to include questions that were graded automatically as well.
- update grades: A button used to refresh or update the information about the grading already completed for the selected question.
- grade all: A button that allows you to proceed to grading all responses for the selected question.
After clicking update grades or grade all, the manual grading page will open.

More about Options
- Attempts to grade: A drop-down menu that determines which attempts will be shown in the manual grading overview. Options:
- Manually graded – displays only attempts containing responses that require manual grading.
- All – displays all attempts regardless of the grading method.
-
Questions per page: A numeric field that determines how many questions will be displayed on one page in the manual grading overview.
-
Order attempts by: A drop-down menu that determines which criterion will be used to sort the attempts in the overview. Options:
- Random – attempts are displayed in random order.
- Date – attempts are sorted by date.
- First name – attempts are sorted by the user’s first name.
- Last name – attempts are sorted by the user’s last name.
- Username – attempts are sorted by the user’s username.
- ID number – attempts are sorted by the user’s ID number.
- Email address – attempts are sorted by the user’s email address.
- Change options: A button that saves the selected settings and updates the overview according to the chosen options.
The manual grading page is used for the individual assessment and grading of a specific student response. Here, the teacher can see the question prompt, the student’s answer, the current grading status, and can add a comment as well as assign the number of points awarded.
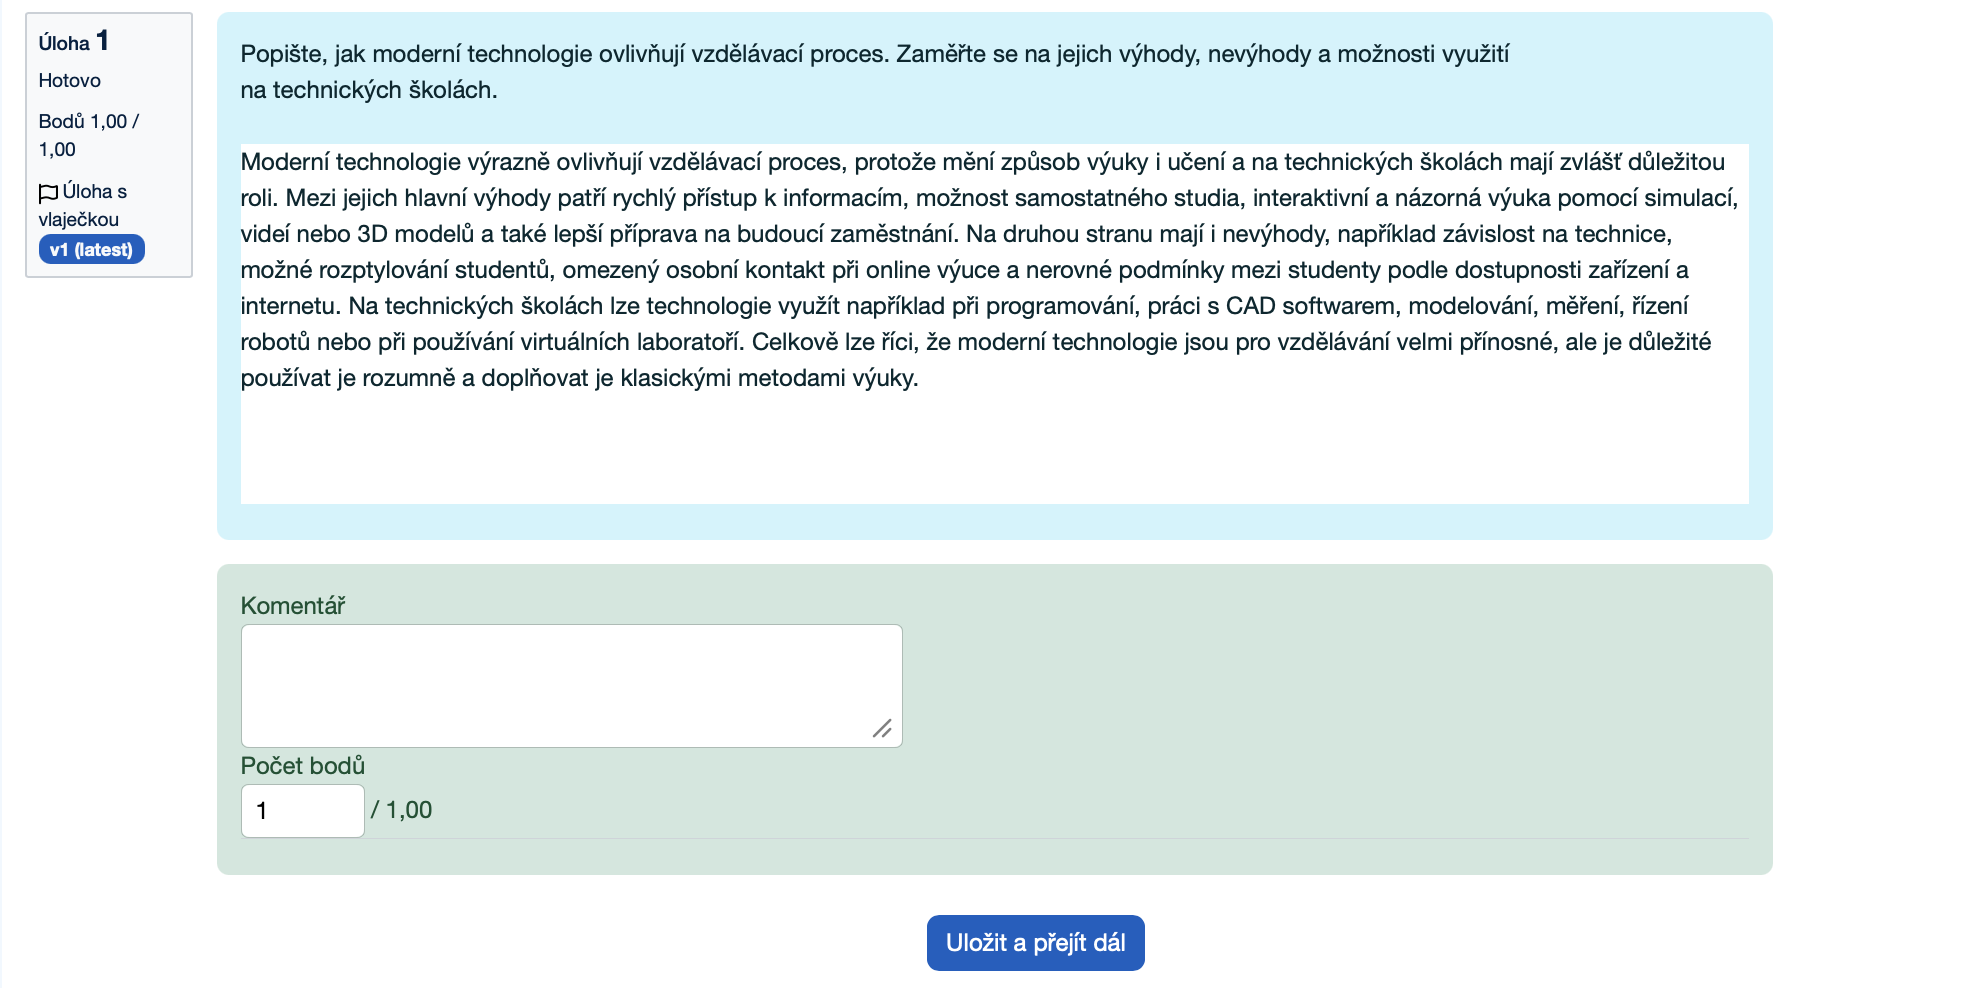
More about Manual grading
- Comment: A text field used to enter written evaluation, feedback, or a note on the student’s response.
- Mark: A numeric field that determines how many points will be awarded to the student for the given response, within the maximum number of points set for the question.
- Save and show next: A button that saves the entered grade and opens the next response or the next item intended for manual grading.